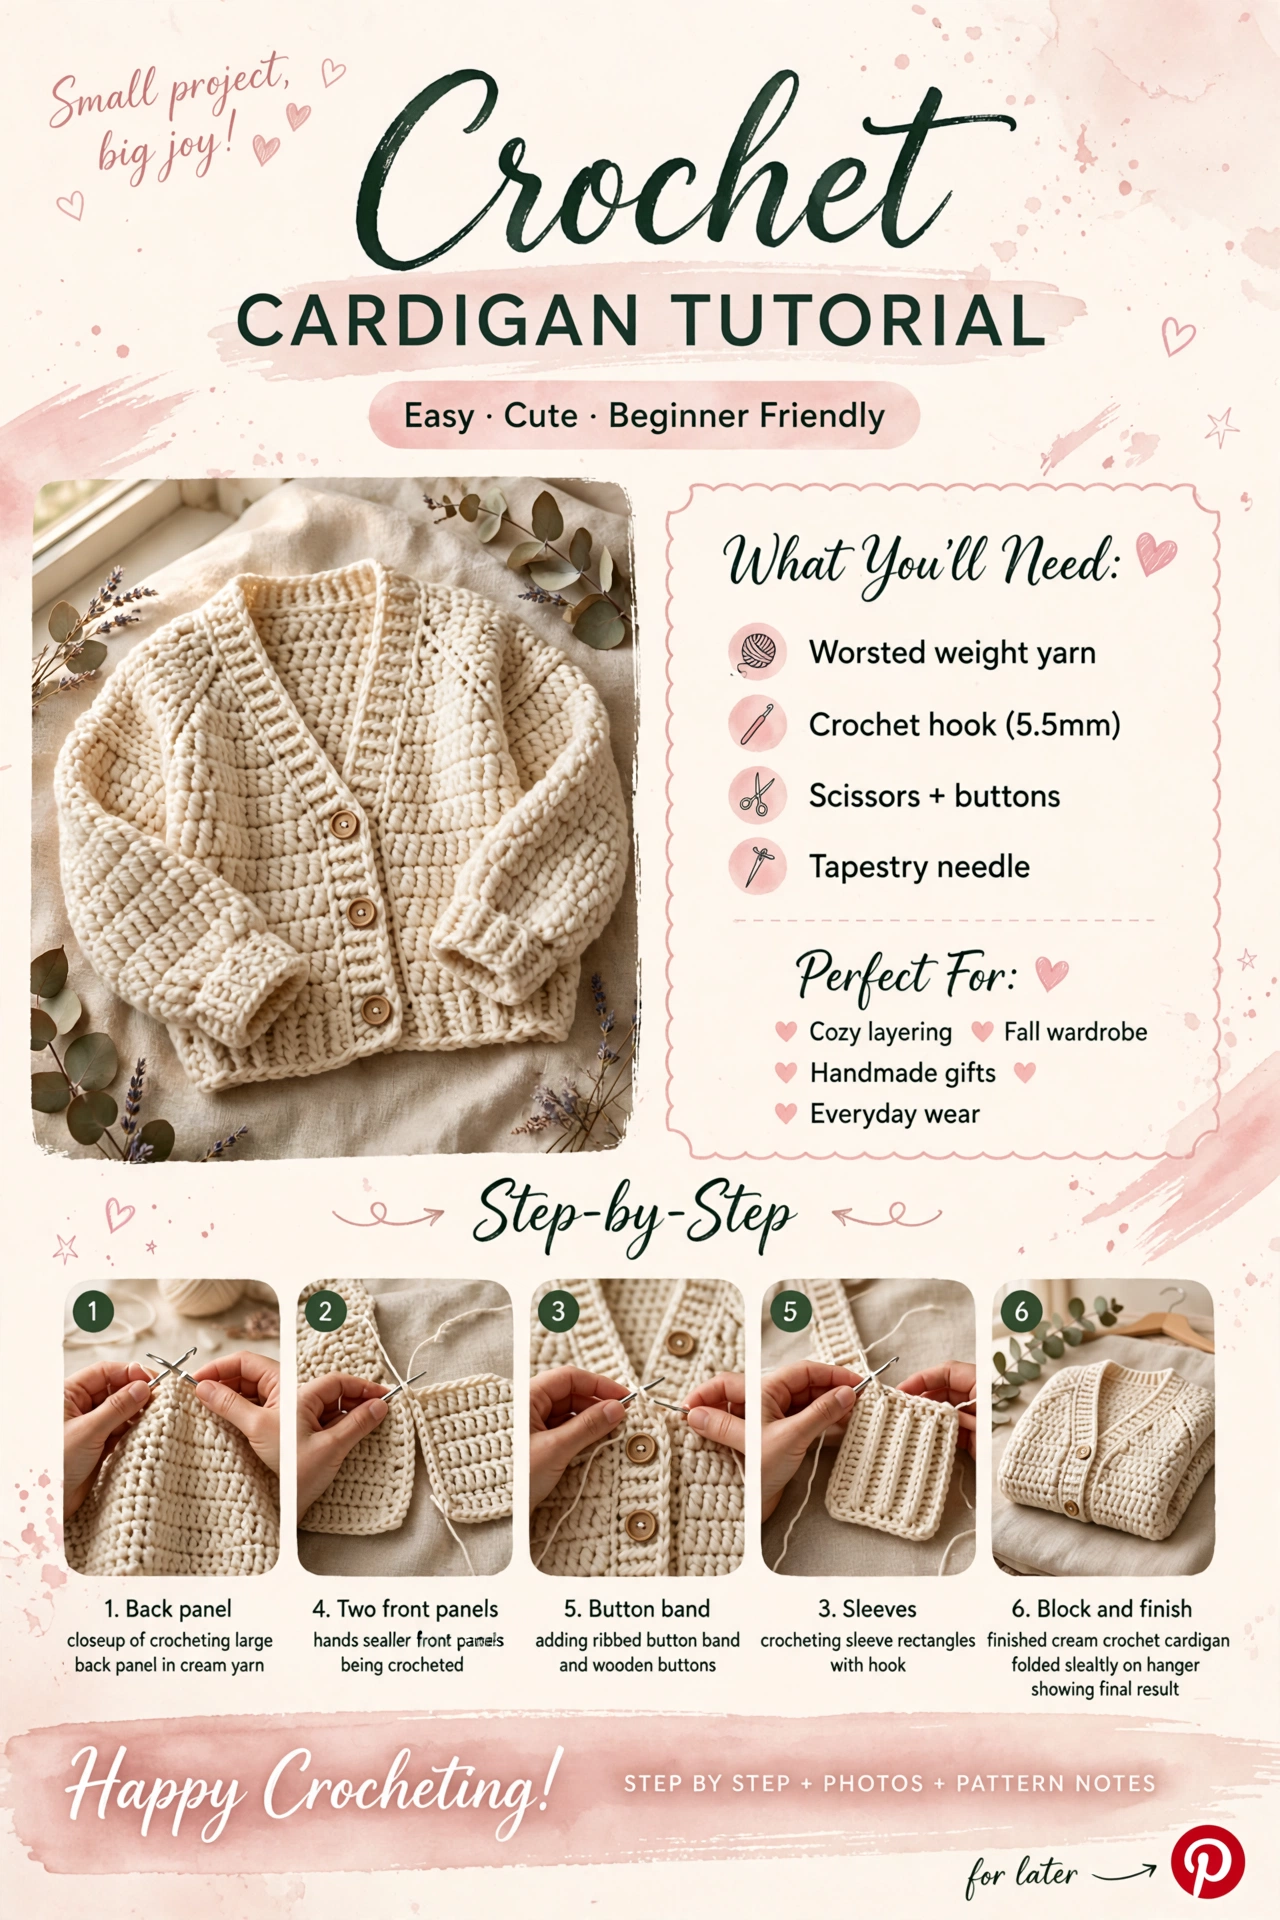
Complete Tutorial Roadmap
- Prepare your materials. Gather worsted-weight yarn, a 5.5 mm hook, scissors, tapestry needle, and buttons.
- Make the back panel. Crochet the main back section to your planned width and length.
- Create the front panels. Work two matching front pieces, leaving the center opening clear.
- Build the sleeves. Crochet sleeve rectangles or tubes for a comfortable fit.
- Join the cardigan. Connect shoulders, sides, and sleeves while checking symmetry.
- Add the button band. Finish the front opening and add evenly spaced buttonholes.
- Block and finish. Secure ends, shape the garment, attach buttons, and make final fit checks.
Materials & Preparation
- Worsted-weight yarn in your chosen color
- 5.5 mm crochet hook, or the hook needed for your gauge
- Scissors
- Tapestry needle
- Buttons suitable for the garment
- Stitch markers, optional
Gauge and sizing
Make a small swatch before the garment. If the fabric is too tight, move up a hook size; if it is too loose, try a smaller hook. Plan the bust width, body length, sleeve length, and upper-arm circumference before starting.
Useful Crochet Abbreviations
- ch — chain
- sc — single crochet
- hdc — half double crochet
- dc — double crochet
- sl st — slip stitch
- st — stitch
- rep — repeat
Step-by-Step Crochet Cardigan Pattern
Step 1 — Crochet the back panel
Make a foundation chain representing the desired back width. Work your chosen main stitch across the chain, turning at the end of each row. Continue until the panel reaches your planned body length.
Step 2 — Make the two front panels
Divide the front width into two pieces. Crochet the first panel to the same general length as the back, then repeat for the second panel with the same stitch count and row count.
Step 3 — Join the shoulders
Lay the back and front pieces flat with their outer edges aligned. Join the shoulder sections while keeping the center front open.
Step 4 — Create the sleeves
Work each sleeve as a rectangle or tube according to your preferred construction. Make the cuff width comfortable, then continue until the sleeve reaches your desired length.
Join the sleeve seam and position the sleeve inside the arm opening. Match the sleeve center with the shoulder seam before joining.
Step 5 — Close the side seams
Align the lower body and underarm edges. Join each side from the bottom toward the underarm, keeping the seam line straight and matching both sides.
Step 6 — Add the button band
Work an edging around the front opening and neckline. A few rows of single crochet create a firm border, while a ribbed edging gives more structure.
On one front side, make evenly spaced buttonholes. Place the first and last openings away from the extreme edges, then distribute the remaining openings between them.
Sew the buttons opposite the openings with several passes of the tapestry needle and secure the yarn on the inside.
Step 7 — Finish the cuffs and lower edge
Add a simple border or ribbed edging to the cuffs and bottom edge if desired. Keep your edging tension relaxed enough that it does not pull the garment inward.
Troubleshooting & Fit Checks
The panels are different sizes
Check stitch and row counts first. If the difference is small, blocking may help. If one panel is noticeably larger, correct it before assembly.
The shoulders feel tight
Check shoulder width and sleeve placement before sewing permanently. Small adjustments during assembly can make the garment much more comfortable.
The button band pulls
The edging may be too tight. Try a larger hook for the border or add a little more space between buttonholes.
The bottom edge waves
Check stitch counts and tension. Too many edge stitches can create ripples, while too few can make the edge cup inward.
Finishing, Blocking & Assembly
Weave in every loose yarn end securely before the final block. Anchor ends through several nearby stitches before trimming.
Gently shape the cardigan on a clean dry surface. Straighten the front edges, align the sleeves, and even the bottom edge without aggressively stretching the fabric.
Let the garment dry completely, then reinforce the buttons and inspect every seam.
Variations & Personalization
- Use a contrasting color for the button band.
- Add wider ribbed cuffs.
- Wear it open as a relaxed layer.
- Choose wooden buttons for a natural handmade look.
- Add simple stripes between rows.
- Adjust body and sleeve lengths for cropped or longer versions.
Care & Storage
Follow the care instructions for your chosen yarn. Gentle washing and careful drying help preserve the garment's shape.
Store the cardigan folded rather than hanging for long periods, especially when using heavier yarn.
Final Notes
A crochet cardigan becomes much easier when you break it into the back, two front panels, sleeves, seams, and edging. Measure as you work and use the checkpoints before moving forward.
Save this tutorial for your next cozy handmade project and explore more beginner-friendly crochet patterns from Sara Rain Crochet.